
Since the forum doesn't support tables, and that's the best way I can think of to display this, I'll link a table here.
Edit Flags Grid
This grid will be updated as I test and find out more, but I wanted to get this out to you guys so you can start reaping the benefits.
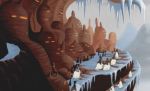
The most exciting part - GLOW!! (you heard me right, Bandu)

And of course, had to try it out on my map...a little intense in the pic

TUTORIAL
THE ZERO EDITOR LIGHTING METHOD
Note: As/if anyone finds out more information that is not provided here, please let me know so that I can edit this and we can keep all the information in this tutorial.
Although you could conceivably apply edit flags items at any time, it's probably best to make it the last step before exporting your model out of XSI.
Here's a graphic to provide quick overview of the edit flags interface.

PolygonIDs -This will automatically fill in with the polygon ID's you selected AFTER you apply the effect. See the end of this tutorial on how to get back to this dialog box to change your effects.
Emissive Color - As far as I can tell, this has to do with attaching lights to materials. See the BF2_lighting.doc
Cast Shadows - if the object should cast shadows, check this box.
Receive Shadows - if the object should recieve shadows, check this box.
Transparency - 0 sets the polygon to opaque (solid), 1 sets the polygons to use transparency (will use the texture's alpha channel), 2 is untested yet...perhaps additive transparency?
Hard Edged Transparency - (from the docs) Hard edged transparency enables alpha testing and does not write pixels whose alpha is below a certain value.
Render Types - This is the obscure setting that determines what effect is used. See the Edit Flags Grid for a key of what some of these are. The grid will be updated as things are discovered. Some are not as obvious as others, so testing is needed to figure it out.
Data 0, 1 - a variable for the Render Type. The function of this varies from mode to mode. See the Edit Flags Grid for reference.
Texture 1, 2, 3 - The name of a texture (in your msh folder) to be included as a variable for your texture. The function of this also varies between Render Types. See the Edit Flags Grid for reference.
Once you're done modeling and texturing your object, select the polygons that you want to apply the effect to. In this case we'll be applying glow to this object.
Hit 'u' to go into poly select mode and select the polys you'd like to glow.
Go to File -> Pandemic Tools -> Edit Flags.

See the Edit Flags Grid to reference what effect you want. Glow is 11, so I set Render Types to 11.
In this case, Data 0 (I think..still testing
Also in the case of glow, the Texture 1 field refers to a map for the glow (where it will glow). The lighter parts of the image will glow more intensely than the darker, and the glow color is also dependant on the color of this texture.
I used a 128x128 tga that is just solid white for this example. There's no 'explore' dialog for the texture fields, so you just have to type it in manually.
Once you're done with the settings, hit OK.
If at any time you want to go back and edit the attribute you just set, hit Alt+8 to bring up your explorer, find your object, expand it, and double click MAT_ATRB. If there are more than one polygons with different effects per object, they will be labeled MAT_ATRB1, MAT_ATRB2, etc.
Now, before exporting your model, be sure to get out of polygon mode. Just hit the spacebar to do so.
Once you've got your model into ZeroEditor, you'll notice that the polygons selected for glow are now in black & white. And, to my knowledge, in order for something to glow, it needs a light shining on it, so you’ll see I added a light and directed it at the object.

That’s it! After I munged and brought it into the game, this is the result.

--------------------------------------------
THE VERTEX LIGHTING METHOD
In XSI, texture your object as you normally would. I reccomend using Lord-Bandus method.
Apply a Color At Verticies Map to your model. Property -> Color At Verticies Map

You may apply vertex lighting to your model while viewing the texture mode, but I reccomend changing your view to Constant for better visibility. Swap back n forth between that and texture mode if needed.

You may also apply vertex lighting using the entire model, but for this example, I'm selecting individual polygons and applying lighting to the selection only. As you can see in the image above, I've textured a cube with the default texture and arranged it so one square of the texture is on each polygon division on the front face of the cube. I selected the first polygon (u key) and hit Ctrl+w. This will bring up the Brush properties of the vertex coloring brush. Mess with the size, opacity, hardness, etc if you wish. If you're applying your vertex lighting to a polygon selection, click the Vertex Colors tab and in the selection dropdown, choose Use. Select the color you want to paint with from the pallette. The brighter the color, the brighter the lighting and the brighter the glow.

To paint color (lighting) onto your mesh, press Shift+w, and paint away. Note that you need to paint the verticies. Painting the faces will not produce any results.
You can see in my example image above that I've colored my cube with a nice grayscale from black to white (again, shown in constant mode for greater visibility).
Now, to add glow, it's the same steps.
Select the polygons you wish to apply the glow to (shortcut key u)
File -> Pandemic Tools -> Edit Flags
Choose 11 under Render Type
Adjust Data0 and Data1 for flicker (I think
Select a glow map in the Texture 1 field (in this case I just used a 128x128 white tga to apply glow to the entire surface)
Hit OK.
If at any time you want to go back and edit the attribute you just set, hit Alt+8 to bring up your explorer, find your object, expand it, and double click MAT_ATRB (or MAT_ATRB2, etc).
Be sure to get out of polygon mode before exporting. Just hit the spacebar to do so.
Once exported, and an odf is created, you must also designate this model as vertex lit. To do, create an option file.
Just make a new text file, and name it your msh name and add the extension option. In my case, I exported cube.msh from xsi, so my option file's name would be cube.msh.option.
Pop open the option file and just type "-vertexlighting" (no quotes).
That should be it. Place your model in ZE as normal, munge, and enjoy your vertex-lit object. Here's what my gradient cube looks like (notice I got fireflies to work too

Note that there are NO lights in the image above, just the ambient top & bottom colors in ZE
I'm still working on how to adjust the brightness of the glow. It currently seems like the glow just 'turns on' after a certain point. Haven't found a way to fine tune it and tone down the brightness of it. If anyone figures it out, notify me and I'll post an addendum.