Here I will show how you can add some nice battle damage effects to your units. I'll be using the stock republic skin rep_inf_ep3trooper.tga for an example. [!] indicate useful tips for those who know how to use GIMP fairly well. If you ignore them, you'll still get the regular skinning-for-dummies info, but your knowledge will not be complete.
The original, just to start it off:

1) Scratches
First, select the lasso-shaped free select tool.

[!] If you're familiar with the paths tool, you might use that instead to make more precise selections.
Drag the mouse over the skin in a straight, short line where you want to make the scratch. It doesn't have to be perfectly straight, but make it straight as you can. Once you've done that, you'll get something that looks like this:

[!] You can hold shift while your making the selections to make several at once. This can increase the speed of your work, since you can go over them all at once, rather than one at a time.
Select the paintbrush or the dodge/burn tool; both accomplish this next step well, though slightly differently.

[!] Another option would be to use Colors > Colorify from the menu, and choose a color that looks fitting.
Experiment with the settings on each. You should almost always use a low alpha setting, and it is usually wise to use either pure white or black for your color. Use the brush to go over the selection you made, and take a minute to look at your result. If you don't like it, undo and try again with different settings. It takes a trial and error to find the best way to go for any particular skin.
The result:

2) General Damage
There are a few good ways to do this, and for the best results you should often combine them. You can:
- A)
Use the "galaxy" paintbrushes and simply paint over the image


[!] The galaxies aren't the only brushes that can do well. Use some other brushes, too, every now and then.
- B)
Scribble around with the free select tool to select a sporadic area.

Then fill it up like you would a scratch, but typically with less alpha.

[!] This can be a great place to use the smudge tool sometimes. Just use it to smooth out some of the rougher edges of the stuff, and you can produce some much nicer effects. Be careful not to overuse it, though.
- C)
Smudge some stuff. This should be pretty self-explanatory, just use the smudge tool a little bit in a few places. Definately don't do it too much, though, because it will soon start to make your skin look much worse.

[!] The blur/sharpen tool can also be used similarly to the smudger.
As you can see, the difference is hardly noticable. It's a good idea to keep it this way when dealing with these tools.

- D)
Using the fuzzy circle brush and low alpha values for any of the tools, you can make some great, though subtle, enhancements to the skin.


2) More Damage Ideas
Use different colors other than just plain black and white and repeat the above general damage steps, to make the skin look dirty and not just battered.

Use a combination of brushes, smudging, and sporadic free selections in concentrated areas with a very dark black color to create scorch marks

If you're adding much mud and such, it's smart to add some extra dirt color and details on the feet and lower legs.

You can make white scratches and other damage effects on the colored paint to make the colors appear to have more wear & tear. (As you may have noticed, the stock skin already has a good amount of this.)

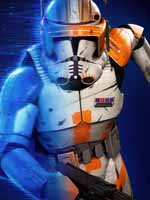
Now, let's compare the orginial to the result, side by side, shall we?
Hidden/Spoiler: